Blog

  • Optical or Digital: Minimum focusing distance on iPhone 15 Pro Max 5x camera

    All camera lenses have a minimum focusing distance. That is the closest you can be to a subject and still get it in focus.

    The minimum focusing distances for iPhone cameras aren’t listed on the tech specs page, but it looks like it’s around four feet on the 5x camera on iPhone 15 Pro Max.

    On any traditional camera system, as you move too close it would fail to lock focus and the subject would become blurry. But if you move too close with your iPhone, it will automatically switch to a 5x digital zoom taken from the main camera.

    This is because the 1x lens has a much closer minimum focusing distance. This behavior is similar to how recent iPhones switch from 1x to the 0.5x camera for macro shots.

    From one point of view this is good because you still get a photo where the subject is in focus. But it will also have visibly reduced quality.

    When I tap the 5x button I want to use the 5x camera. That’s why I bought the bigger phone this year. If I know I’m getting the digital zoom I’d rather back up a few inches to get the real thing, but there’s no on-screen indicator that it changed. No icon or text anyway.

    If you’re paying attention you can sort of tell when it switches. The cameras are in different positions on the back of your phone, so the image changes perspective ever so slightly. It looks like the image shifted up/down or left/right by a few pixels, which is easy to miss.

    If this matters to you, I’d suggest taking some test shots of moderately close subjects to get acquainted with the distance where it transitions between cameras.

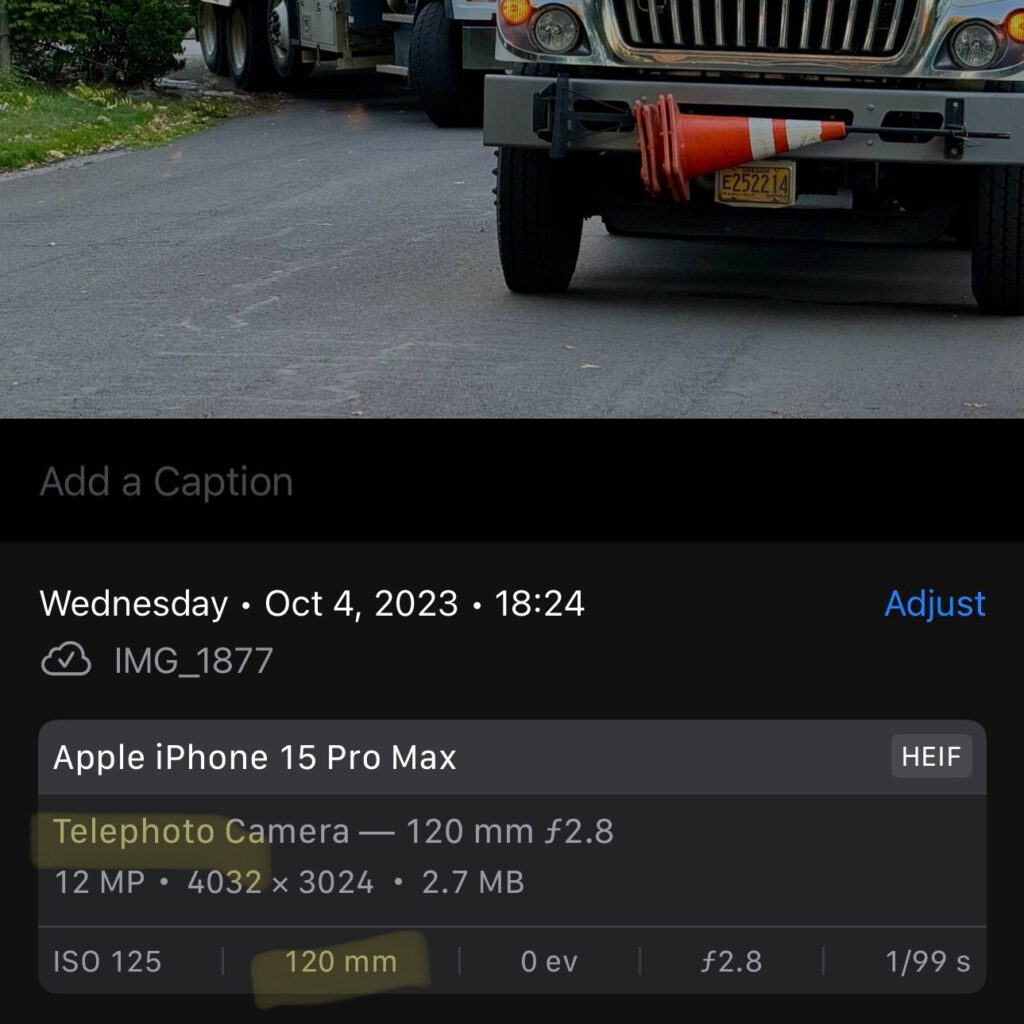
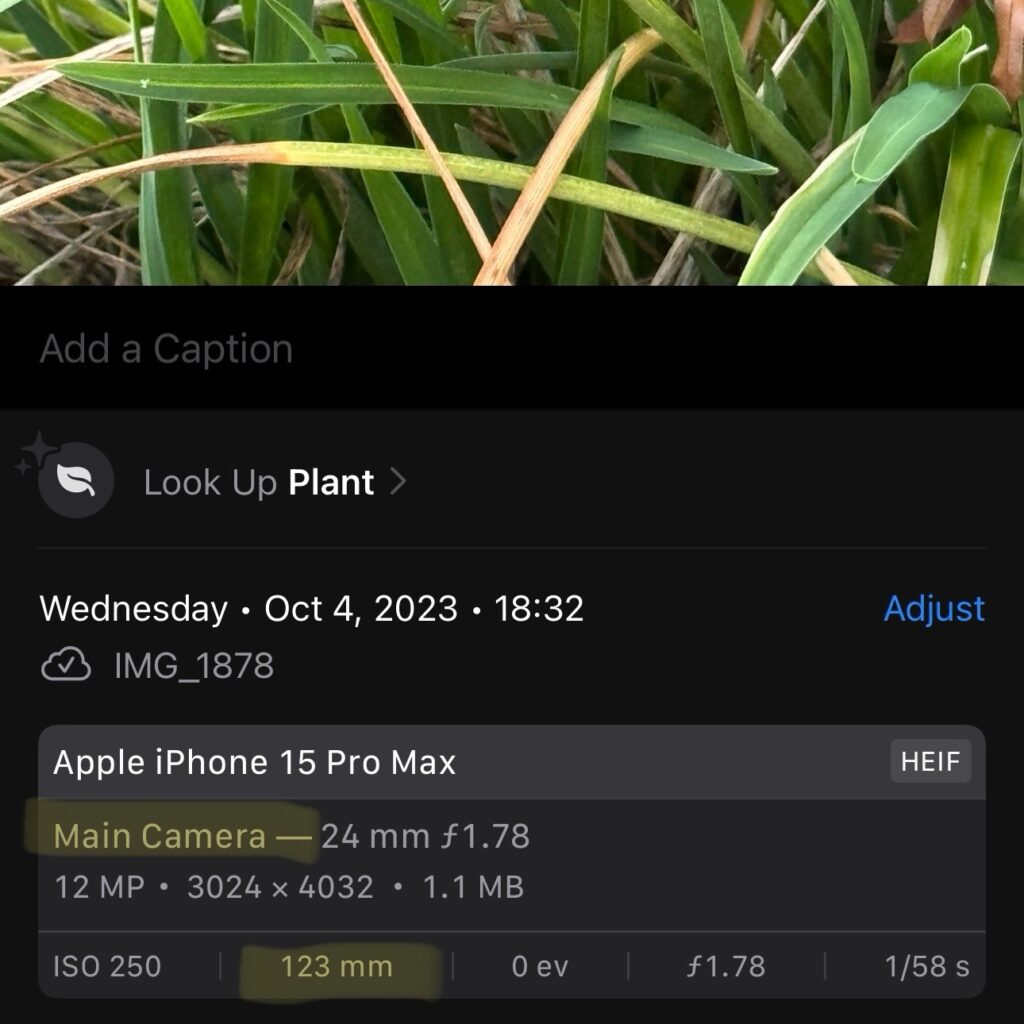
    Once you’ve taken some test shots you can swipe up to show their metadata. Look for text that says Telephoto Camera vs. Main Camera. And if you pixel-peep you can definitely tell the difference.

    In the examples below you can see the trucks were captured with the telephoto camera while the plant was too close and switched over to a digital zoom on the main camera.

    5x photo taken with Telephoto Camera
    5x photo taken with Main Camera
  • Mastodon discoverability on your domain using the nginx location directive

    tl;dr: Puts the .well-known/webfinger content in your server config instead of the filesystem.

    This setup is inspired by Maarten Balliauw‘s Mastodon on your own domain without hosting a server. Please read the linked post for details. The general idea is you can create a special file on your website that allows people to find you on Mastodon by searching for @you@yourdomain.tld even though you don’t run an instance on your domain.

    Here’s my twist: What if you can’t or don’t want to add this file directly to the filesystem where your web content lives? Maybe your site is running a CMS that precludes adding arbitrary files. Or you just don’t want to forget to preserve the file between software upgrades and reinstalls. Whatever your reason, you can do this by putting the file content inside of a location directive in your nginx config instead.

    These instructions assume you have a working knowledge of nginx configuration and server administration.

    1. In a browser navigate to https://<your mastodon server>/.well-known/webfinger?resource=acct:<your account>@<your mastodon server>
    2. Select and copy the json text that appears on the page.
    3. Edit the nginx config file that contains the server block for your domain.
    4. Add a new location directive like below, replacing your-code-here with the json that was copied in step 2.
      location /.well-known/webfinger {
           return 200 'your-code-here'; 
      }
    5. Save your config and restart nginx.
  • iCloud with Custom Email Domains

    Google announced that users of their “G Suite legacy free edition” will soon have to start paying. I’ve begun exploring my options, the first of which was iCloud. (For those who don’t know, Apple recently started supporting custom email domains for users of any paid tier of iCloud.)

    Features

    • No additional cost if you already pay for iCloud
    • No need to check another account—your mail arrives in your existing iCloud inbox.
    • If you’re in a family sharing group you can let others have an account under your domain too.
    • Can add multiple domains.
    • Setup includes SPF and DKIM.

    Limitations

    • You can only add three email addresses per user.
    • It doesn’t seem to be possible to set up a wildcard that receives mail sent to any/all usernames at your domain.
    • You can’t give an account to someone who isn’t part of your family sharing group.
    • You can only add five domains. Yes that seems like a lot but it presents a problem for some of us.

    Verdict

    This is a compelling option for many people. It’s perfect for those who have a small number of domains all to themselves, or who have a domain they want to share with immediate family who are all in the Apple ecosystem. That covers a lot of non-business use cases.

    But personally I won’t be able to use it—at least not exclusively. I have more than five domains and some of them have users who are not in my family group. I may end up pointing one or two at iCloud, but I’ll have to look elsewhere for the rest.

    If it looks like iCloud would work for you, read on for a tour of the setup process.

    Setup

    To get stared, sign into your iCloud account and click on Account Settings.

    Main screen of iCloud after signing in.

    Scroll down to Custom Email Domain and click Manage.

    Click the Manage button under Custom Email Domain.

    If you’re part of a family sharing group you’ll be asked if the domain is just for you, or if you want to share it with your family members. It doesn’t appear to be possible to change this after the fact. At least not without removing and re-adding the domain.

    Who will use the domain: Only you, or you and your family group?

    You’ll be asked what domain you want to use. This has to be a domain (or subdomain) that you own and have the ability to manage DNS records.

    Enter the domain name you want to use.

    Next you’ll be asked to add and verify (via email) any existing addresses you want to use. I’m not sure why this is necessary since you could always add them after.

    Add existing email addresses if you were using this domain for mail with another provider.

    Now we need to update some DNS records using values Apple provides. Exactly how this is done and what it looks like will vary by DNS service, depending on whether it’s on a server you directly administer, or via a control panel provided by your registrar such as Hover, GoDaddy, etc. The records we need to add are:

    • Two MX (2) records which determine where mail should be delivered for your domain.
    • Two TXT records. One verifies ownership of your domain. The other is for SPF, which lets the world know which servers are allowed to send mail on your behalf.
    • One CNAME that points to a DKIM record. This identifies a key that will be used to sign mail sent from your domain. It helps other email servers know that the mail is legitimately from you and was not spoofed or tampered.
    DNS records to add to your domain.

    After creating or updating your records, click Finish set up. At this point Apple will reach out to your DNS server and check that the records were entered correctly.

    Confirm that you’ve updated your records.

    If everything looks good you’ll get a message confirming that it’s ready to go.

    The domain was added successfully.

    Now you can create any additional addresses that you didn’t enter earlier.

    That’s it! From here it’s just another email address you can use wherever you access your iCloud mail.

  • Ubiquiti UniFi Access Points with VLANs on Juniper EX switches

    It is assumed that you already have VLANs configured on your switch and router. This post only describes how to configure the ports that your APs connect to.


    If you want to use VLANs on Ubiquiti’s UniFi line of access points, the switch ports they connect to must offer a native or untagged VLAN in addition to being a trunk port.

    On Juniper EX switches this is accomplished by setting interface-mode to trunk, but also specifying a native-vlan-id.

    Your APs get an IP address on the native VLAN, and that becomes the network that is used to manage them.

    Below is the configuration I use for the ports my APs live on. I’m using an interface range to ensure all my AP ports are set up exactly the same, but you could also put this config directly on each interface:

    # show interfaces interface-range unifi  
    member ge-1/0/1;
    member ge-1/0/2;
    member ge-0/0/11;
    description "Ubiquiti UniFi access points";
    native-vlan-id 1;
    unit 0 {
        family ethernet-switching {
            interface-mode trunk;
            vlan {
                members [ client iot ];
            }
        }
    }

  • Comparing Lists in Python

    If you have two lists that have the same content in a different order (1, 2, 3, vs 3, 2, 1) are they they the same or different? Python considers them to be different.

    In some cases order may not matter to you, and you just want to know if the same items exist in both lists. When this happens there are a couple ways you compare them.

    1. You can use the built-in sorted() function. This lets our “if” statement compare an alphanumeric sorted version of the list without modifying the content of the variable. If you print the variable after using sorted() the items are still in the original order.
    2. Or you can use the .sort() method. This also puts them list items in alphanumeric order, but it additionally stores these changes in the original variable. If you print the variable out after using .sort() they will be shown in the new order.

    Example code that illustrates both options:

    #!/usr/bin/env python3
    
    list1 = [ 3 , 4 , 5 , 1 , 2 ]
    list2 = [ 5 , 4 , 3 , 2 , 1 ]
    
    print("Comparing original lists")
    if list1 == list2: 
        print("Same")
    else:
        print("Different")
    print("list1:" , list1)
    print("list2:" , list2)
    
    print("Sort and compare using sorted()")
    if sorted(list1) == sorted(list2):
        print("Same")
    else:
        print("Different")
    print("list1:" , list1)
    print("list2:" , list2)
    
    print("Sort and modify using .sort()")
    if list1.sort() == list2.sort(): 
        print("Same")
    else:
        print("Different")
    print("list1:" , list1)
    print("list2:" , list2)

    The output:

    Comparing original lists
    Different
    list1: [3, 4, 5, 1, 2]
    list2: [5, 4, 3, 2, 1]
    Sort and compare using sorted()
    Same
    list1: [3, 4, 5, 1, 2]
    list2: [5, 4, 3, 2, 1]
    Sort and modify using .sort()
    Same
    list1: [1, 2, 3, 4, 5]
    list2: [1, 2, 3, 4, 5]
  • Shell scripting: Iterate over a list line-by-line instead of word-by-word

    Let’s say a directory contains these files:

    My First File.txt
    My Second File.txt

    If you wanted to take an action on each distinct file, you might try something like this:

    for file in `ls ~`; do echo $file; done

    The output will look like below, because the spaces and line breaks are both treated delineators of a new item in the list (ie. a new assignment to the “file” variable.)

    My 
    First
    File.txt
    My
    Second
    File.txt

    If your intent was to act on the complete filename (using only line breaks as indicators of a new item) then you can instead pipe your output through a “while” loop like this:

    ls ~ | while read item; do echo $item; done

    Which will yield the desired output:

    My First File.txt
    My Second File.txt
  • Munki nopkg to turn Bluetooth on and off

    I’ve posted a Munki nopkg installer to control Bluetooth. Assigning it for install causes Bluetooth to be (re)enabled whenever Munki runs. Uninstallation turns Bluetooth off.

    https://github.com/davidmnelson/munki-nopkg/blob/master/BluetoothEnabled.plist

  • Restrict Access to WordPress with Nginx and GeoIP

    The goal of this post is to harden your WordPress dashboard by preventing logins from countries where you know you will never be connecting. Since brute-force login attempts may still originate from an allowed country, it would be wise to combine this with other tools like fail2ban or one of the numerous plug-ins that add login rate-limiting restrictions to WordPress.

    This example targets Nginx on CentOS 7 using PHP 7 from the Remi repo. Settings may vary depending on your exact setup, so watch out for differences from your config, and back up your /etc/nginx first!

    First make sure you keep an up-to-date GeoIP database by running a script like the example below via a nightly cron job.

    #!/bin/bash
    
    /bin/curl https://geolite.maxmind.com/download/geoip/database/GeoLiteCountry/GeoIP.dat.gz -o /tmp/GeoIP.dat.gz
    
    /bin/gunzip -c /tmp/GeoIP.dat.gz > /etc/nginx/GeoIP.dat
    
    /bin/rm -f /tmp/GeoIP.dat.gz

    Make sure the GeoIP module is installed:

    yum install nginx-mod-http-geoip

    Make sure the module is loaded in /etc/nginx/nginx.conf:

    load_module modules/ngx_http_geoip_module.so;

    Inside of http { } in nginx.conf, add this, modifying country and default as desired:

    geoip_country /etc/nginx/GeoIP.dat;
    map $geoip_country_code $allowed_country {
       default no;
       US yes;
    }

    And finally add the necessary location statement in your virtual host’s server { }. In this example I’m using PHP 7.1 from the Remi repo, so your configuration may vary.

    location ~ ^/(wp-admin|wp-login.php) {
     try_files $uri $uri/ /index.php?$args;
     # try_files $uri =404;
     fastcgi_pass unix:/var/run/php-fpm/php71-fpm.sock;
     fastcgi_index index.php;
     fastcgi_param SCRIPT_FILENAME $document_root$fastcgi_script_name;
     include fastcgi_params;
     index index.html index.htm index.php;
     if ($allowed_country = no) {
     return 444;
     }
    }
  • Automatically update CentOS 7 with yum-cron

    1. Install yum-cron:
      sudo yum -y install yum-cron
    2. Open /etc/yum/yum-cron.conf in your favorite editor and make sure each of the following values are set to ‘yes’.
      update_messages = yes
      download_updates = yes
      apply_updates = yes
    3. Other optional settings in yum-cron.conf
      # Change from 'default' to 'security'
      # if you only want security fixes.
      update_cmd = security
      # For email alerts (recommended):
      email_to = you@domain.com 
      # If you use a different mail host:
      email_host = smtp.domain.com
    4. Start the service:
      sudo systemctl start yum-cron
    5. Enable the service (makes sure it will start again after a reboot.)
      sudo systemctl enable yum-cron
  • Automatically Update WordPress, Themes, and Plugins using WP-CLI

    WordPress is a hugely popular blog/CMS platform, but with widespread adoption comes risk: It is a common target for hackers, exploits, etc. Accordingly, you should make sure it gets regular updates.

    WordPress has a built-in update mechanism but this also requires that its PHP files be writable by the web server, introducing a new set of security risks.

    Luckily there is another option. Instead you can use a command-line tool called WP-CLI, which enables us to script WordPress updates.

    These instructions will outline the steps necessary to install WP-CLI, create a script to update multiple sites at once, and install that script as a cron job to ensure updates happen on a regular schedule.


    Before You Begin

    As with any WordPress maintenance tasks, I recommend making regular backups of your database and files.

    For this process to succeed, you’ll need to run your script as a user who has permission to modify the WordPress files. This could be your regular user account, but you might also want to create a dedicated user such with a name like ‘scripts’, and give it write permissions to your WordPress files. It is not recommended to run this as root.


    1. Install WP-CLI
      Install WP-CLI (adapted from http://wp-cli.org/#installing)

      curl -O https://raw.githubusercontent.com/wp-cli/builds/gh-pages/phar/wp-cli.phar
      chmod +x wp-cli.phar
      sudo mv wp-cli.phar /usr/local/bin/wp
    2. Test WP-CLI
      Run as a user who has write privileges to your WordPress site. If everything works you should get a series of “Success” messages, and/or a list of updated items.

      cd /var/www/html   # replace with path to your site 
      /usr/local/bin/wp core update
      /usr/local/bin/wp core update-db
      /usr/local/bin/wp theme update --all
      /usr/local/bin/wp plugin update --all
    3. Create an Update Script
      Use your favorite text editor to create a new shell script. In that script, put the following code:

      #!/bin/bash
      
      # Absolute paths of WordPress sites. Space-separated.
      sites="/var/www/html/site1 /var/www/html/site2 /var/www/html/site3"
      
      for site in $sites; do
      
      echo $site
      
      /usr/local/bin/wp core update --path=$site --quiet
      /usr/local/bin/wp core update-db --path=$site --quiet
      /usr/local/bin/wp theme update --all --path=$site --quiet
      /usr/local/bin/wp plugin update --all --path=$site --quiet
      
      done
    4. Make The Script Executable
      chmod 700 wp-update
    5. Test The Update Script
      ./wp-update

      If everything works you’ll see a series of “Success” messages, and/or a list of updated items. If you see errors, double-check that your current user has permission to write to the WordPress site directories.

    6. Install Cron Job
      Make sure you’re still logged in as a user who has write permissions for the WordPress site directories.

      crontab -e

      Now create a new cron entry like this one, including the correct path to your update script. In this example it will run every day at 2:30am.

      30 2 * * * /home/scripts/bin/wp-update

      Close and save your crontab file.

    7. If everything worked correctly, your WordPress sites will now auto-update every night.